
Which Argyle Nails Tutorial Will Become Your Go To?
Looking for an argyle nails tutorial that is simple and totally doable? You will definitely find it here!
This post is dedicated to an argyle pattern, which normally consists of lozenges and diamonds. Though sometimes it’s a single diamond. Usually argyle patterns involve overlapping motifs and add some texture, movement, and 3D effect to the design. Initially, the pattern was peculiar to knitting.
But now argyle is everywhere, and nail art is not an exception. Let’s explore several adorable and fun ways how to recreate the argyle pattern manicure.
Easy Argyle Nail Art Step By Step
Source: Kelli Marissa via Youtube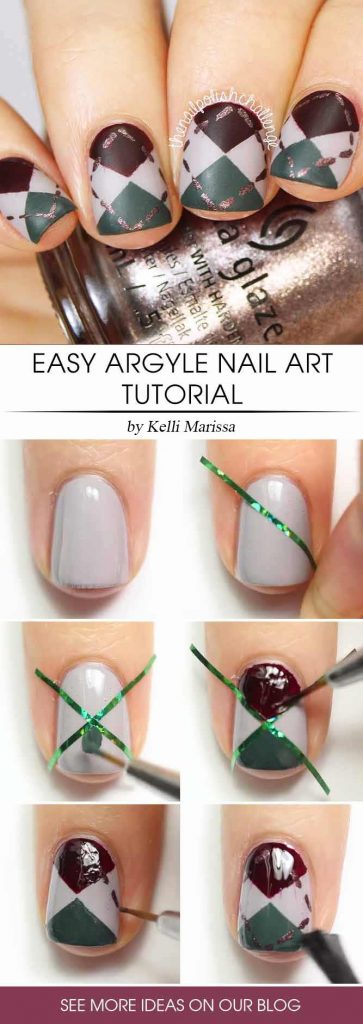
To do this nail design, you will need clear base coat, light grey nail lacquer, a small brush for nail art, striping tape, green nail lacquer, mahogany nail lacquer, coppery silver nail lacquer, top coat for these nail art designs to last longer, and one more top coat, but with a mattifying effect.
- Apply your base coat to clean nails. Wait until it dries.
- Apply light grey nail lacquer.
- Cover the grey color with top coat. Wait till it dries.
- Apply striping tape to your nail in the form of an X.
- Fill the upper triangle in with your green nail lacquer, using a small brush for nail art.
- Remove that striping tape before the green color dries.
- When the green color dries, place an X on your nail with the striping tape again.
- The bottom triangle should be filled with mahogany nail lacquer.
- Again, before the color dries, remove that striping tape.
- With a silver coppery shade, paint a line with dots in the shape of a diamond.
- Wait until nail lacquer dries completely before applying top coat. Finish with the mattifying effect. Done!
A Darker Side Of Argyle Step By Step - Formula X
Source: Trendy Polish via Youtube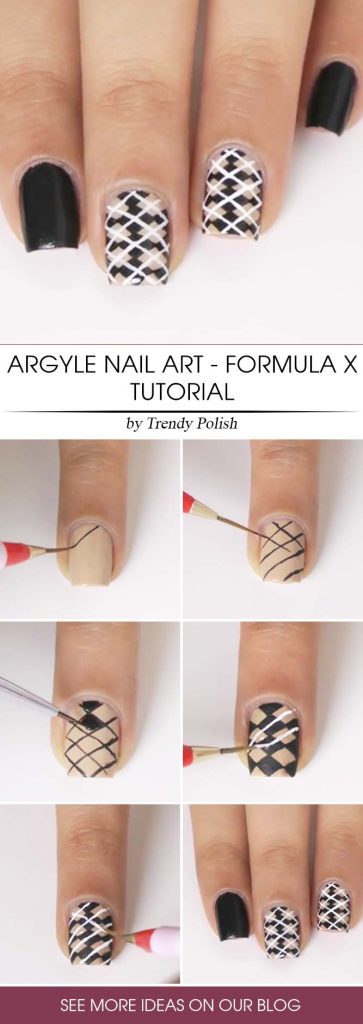
This nail design can be done on either your natural or acrylic nails. And we think that this contrast of white and beige against black is truly classy!
1. Apply clear base coat. 2. Apply beige nail lacquer. Wait till it dries. Apply one more coat of it. 3. Do a diamond patterned design with black nail lacquer. 4. When the black diamond pattern is dry, fill the boxes in with the same black nail lacquer. 5. Using a white shade, diagonal lines that start from both of the sides are created. 6. Finish with glossy top coat. Enjoy!Vivid Dotted Argyle Nail Design Step By Step
Source: Trendy Polish via Youtube
This argyle nails tutorial is super simple. Follow these steps, and your manicure will turn out cute and fun to look at.
- Paint half of a nail in bright pink.
- Apply mint green nail lacquer to another half of the nail.
- Wait till the lacquer dries and apply black dots, using a bobby pin or dotting tool.
- Make a toothpick end sharper, using your nail file.
- With the toothpick, paint thin dots to connect the big dots.
- Apply top coat. Voila!
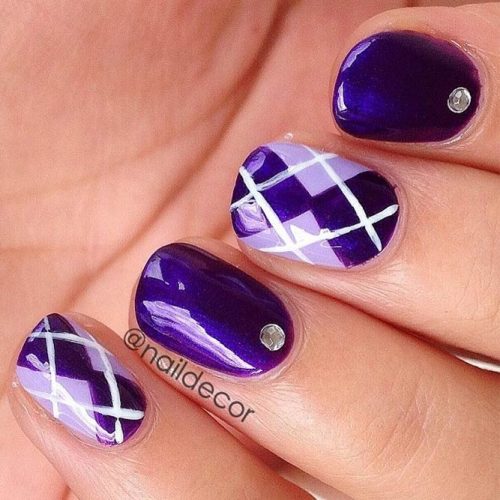
Argyle Purple Wonder Step By Step
Source: Demelza's World via Youtube
Are you a fan of a purple color? It’s definitely among our favorites because it is very pleasing to the eye and also quite bright. Pair purple with the argyle pattern, and you will get an amazing nail design!
- Start with applying base coat.
- Paint your nails light pink macaroon. 2 layers should suffice. Wait till it gets dry.
- Using purple nail lacquer, apply some of it to paper to dip a brush in for painting five thin lines. Or apply fewer lines. It depends on the nail length.
- Switch the side and paint 5 thin lines, crossing the first lines.
- Fill in some sections like you see in the pic.
- Now using nude nail lacquer, create 5 thin lines on the right and then 5 thin lines on the left.
- Apply top coat to your nails. Done!

Red And Blue Argyle Nail Tutorial
Source: Cutepolish via Youtube
This argyle nails tutorial is easy to recreate, you will see! And the colors pair so nicely with each other. Red and blue is always a match. Add light blue, pink, and white for a more dimensional effect.
- Begin with applying base coat.
- Apply 2 coats of vivid blue nail lacquer.
- Paint a thin X with dark blue nail lacquer. Keep your brush in place but turn your finger. Wait until it dries.
- Using dark blue nail lacquer, fill the top and bottom triangles in.
- Now it’s time for white nail lacquer. Paint 2 lines on the right. Wait till they dry. Paint 2 lines on the left.
- Finish the design with glossy top coat. Done!
Now with these simple step by step tutorials you will have no difficulty in recreating argyle nail art. Catch more inspo on our blog!
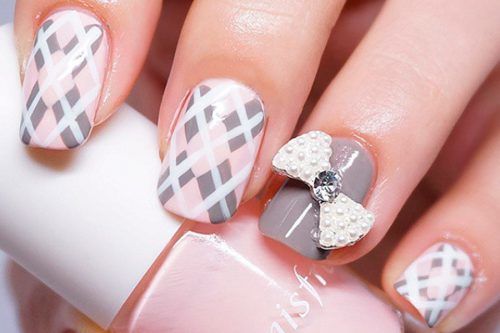
Argyle Nail Design Inspiration
Source: ana0m via Instagram, manal via Instagram, manal via Instagram

FAQ: Argyle Nails Tutorial
Do nail stickers ruin your nails?
The answer is unequivocally no! Nail stickers are made from nail polish and a small amount of adhesive. You’re safe because nail stickers can be peeled off without damaging your nails.
Can you reuse nail rhinestones?
Use genuine Swarovski crystals for reusable sparkle that can be removed and reapplied because acetone will not damage or change their form. If your client prefers a disposable option, use rhinestones or gems, which dissolve easily in acetone.
Was this article helpful?