Are you looking for some easy nail designs you can do at home? Think about all of the money you spend at the nail salon. You can easily replicate most of those looks on your own for less than half the cost. Just choose your favorite colors and break out those nail art tools.
And you don't have to be super-talented to copy these cute nail designs. There are plenty of simple nail designs that you can do yourself at home, which is a great piece of news.
We have put together a list of simple 3 step nail designs that are so easy that you will ask yourself why you didn't try them before! So, break out your favorite nail polishes and nail art tools and try some of our easy nail art designs!
Marbled Easy Nail Designs
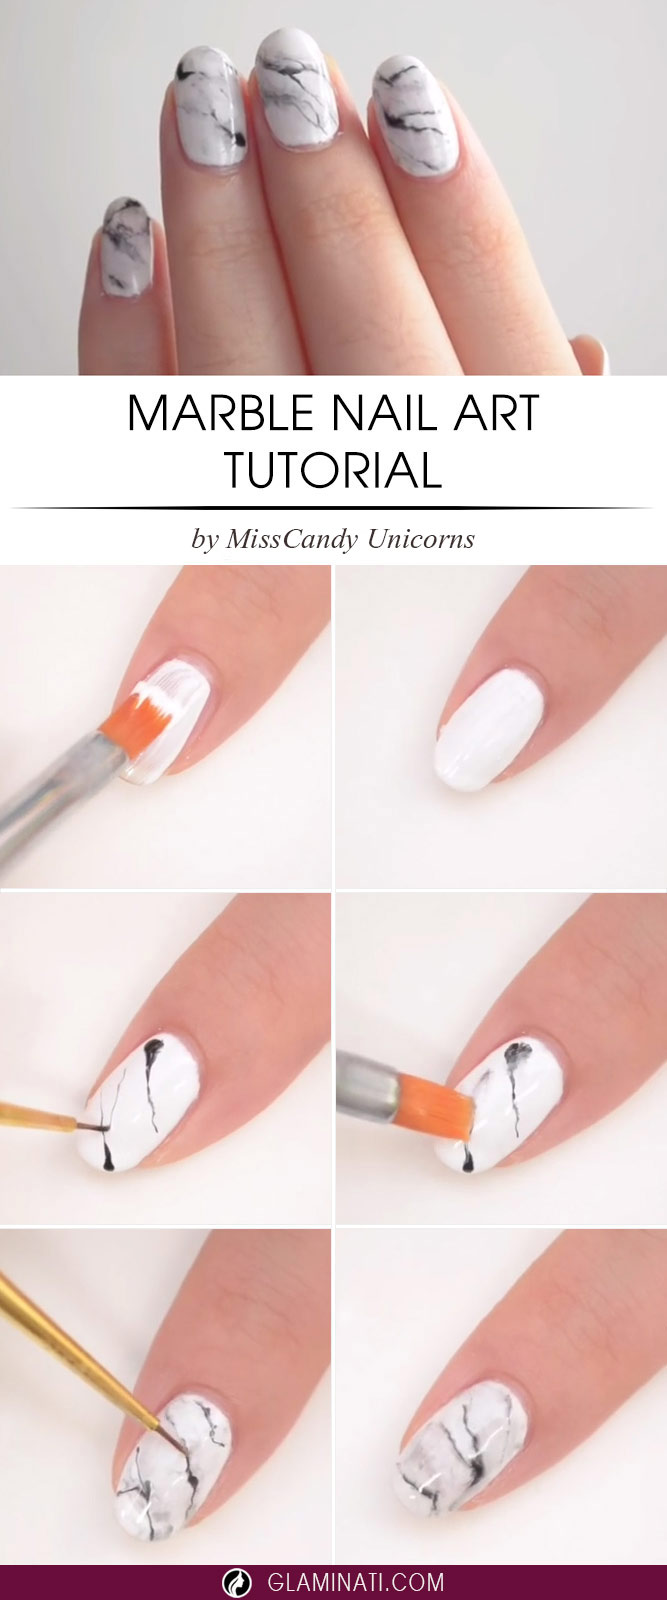
Marble Nail Art
Credit photo: MissCandy Unicorns via YouTubeThis marbled effect is soft and pretty and will work nicely for a special occasion.
1. Choose two contrasting colors. Paint one coat of the lighter shade on all your nails. After it dries, apply a thick coat of the same color.
2. While the thick coat is still drying, use a dotting tool or toothpick to apply the other color.
3. Next, swirl the two colors together for a marbled effect.
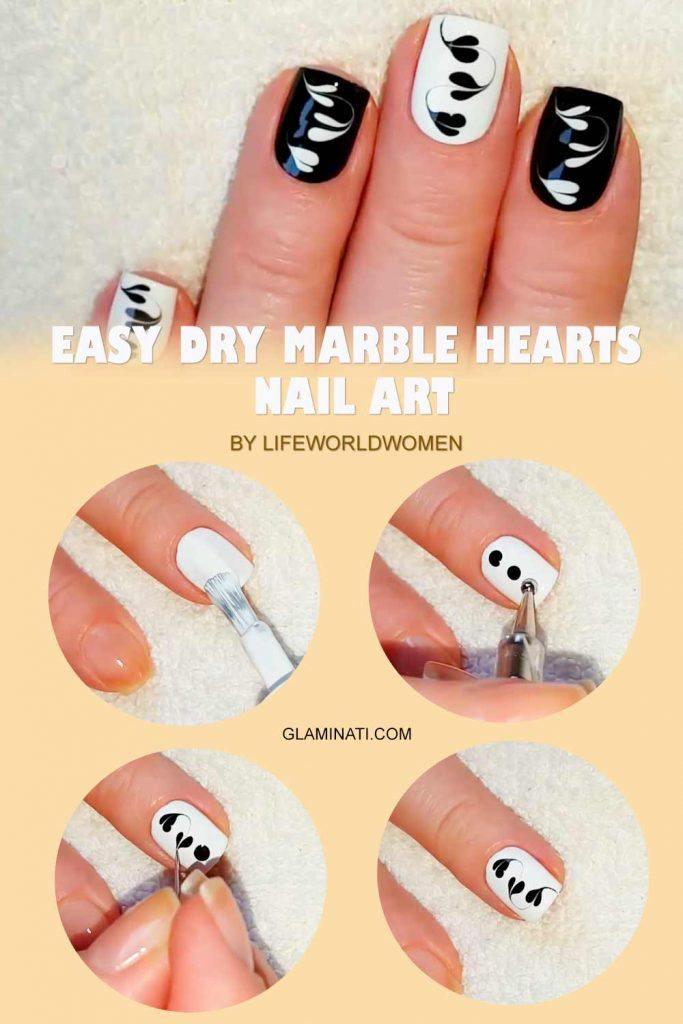
Easy Dry Marble Hearts
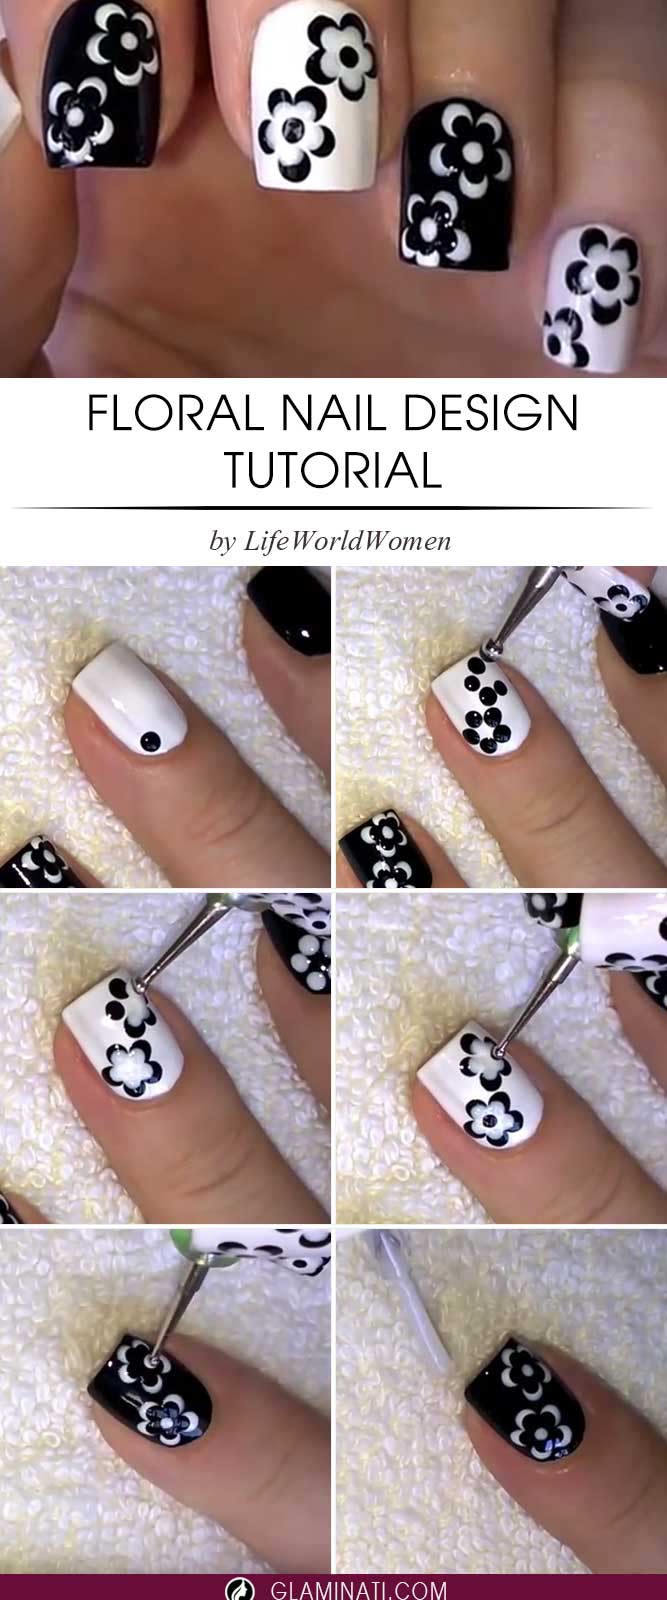
Credit photo: LifeWorldWomen via YouTubeMarble hearts are fantastic, but contrasting hearts are even better, and we are going to help you learn how to replicate those.
1. Paint your pinkie and middle fingers white and coat the rest black.
2. While the nail polish is still wet, add three contrasting blobs to the base.
3.Use a needle or a toothpick to draw through the blobs and create fantastically easy heart design.
Easy Nail Designs With Geometric Art
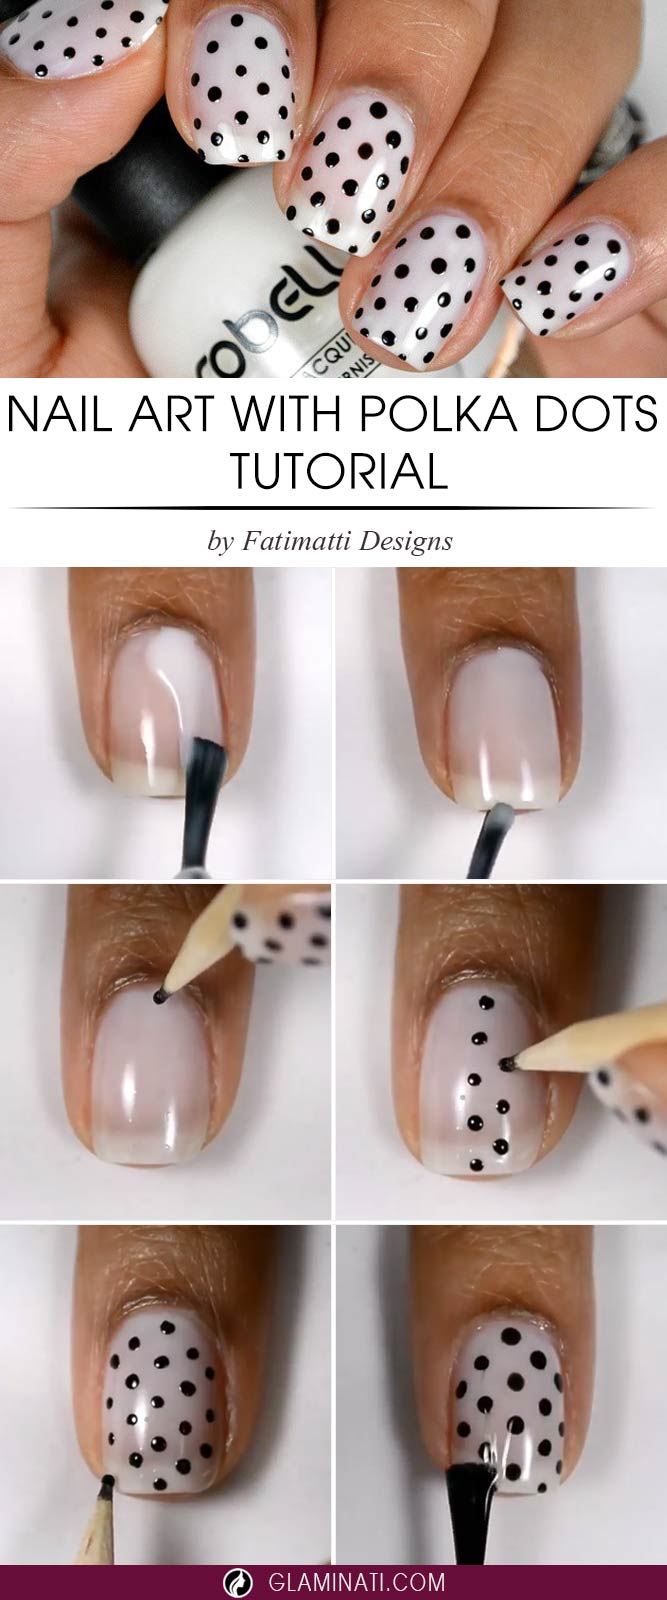
Nail Art with Polka Dots & Bows
Credit photo: instagram.com/fatimattidesignsThis adorable look is cute and feminine. And quite easy to pull off.
1. Paint your nails a pale or nude shade of pink.
2. Use a dotting tool or toothpick to make white polka dots. Skip the ring finger.
3. You may also add a pretty 3-D gem bow to your ring finger.
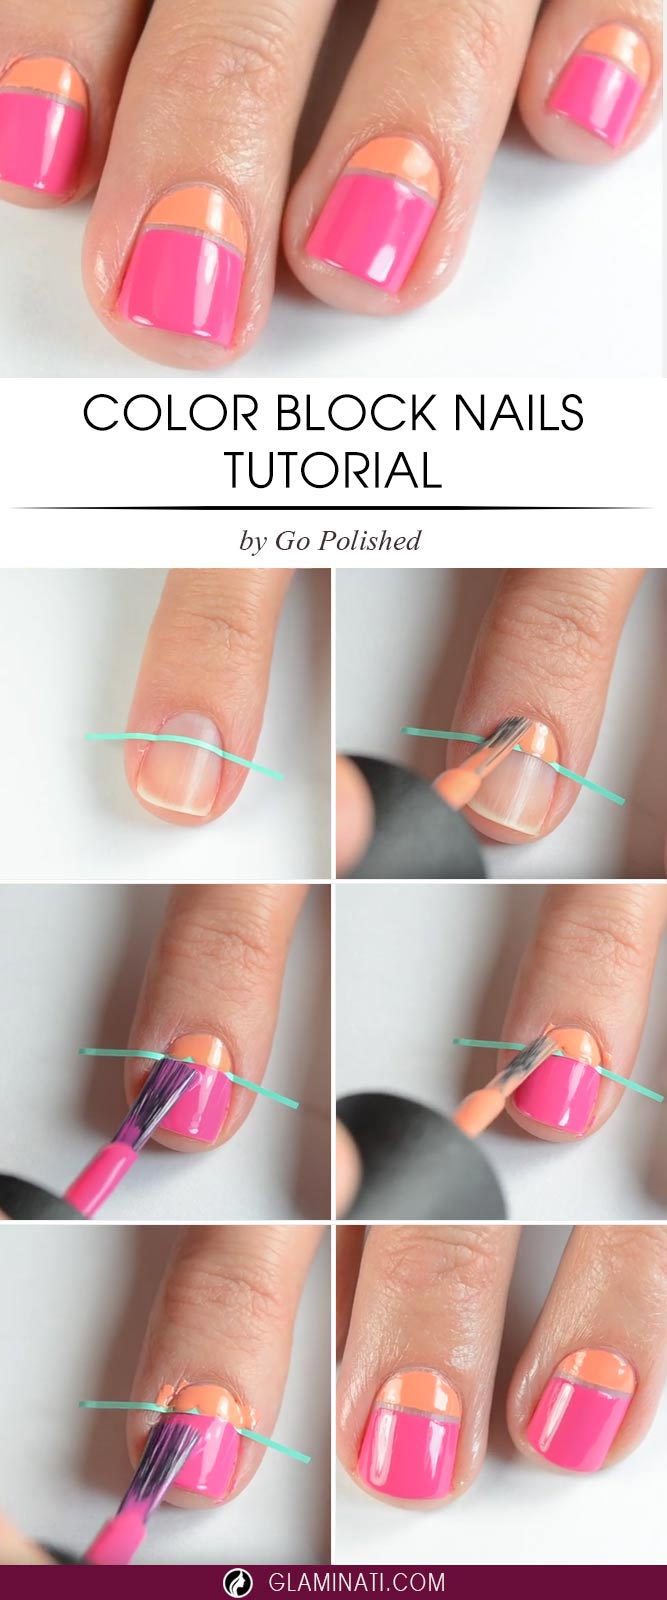
Color Block Nails
Credit photo: Go Polished via YouTubeThis color block effect is really jazzy! You can add 2 bright colors for a bold effect or choose 2 slightly different shades of the same color for a more subtle look.
1. Put a piece of striping tape on each nail, ¾ of the way down.
2. Next, apply 2 coats of the color of your choice and allow to dry.
3. Slowly remove the striping tape.
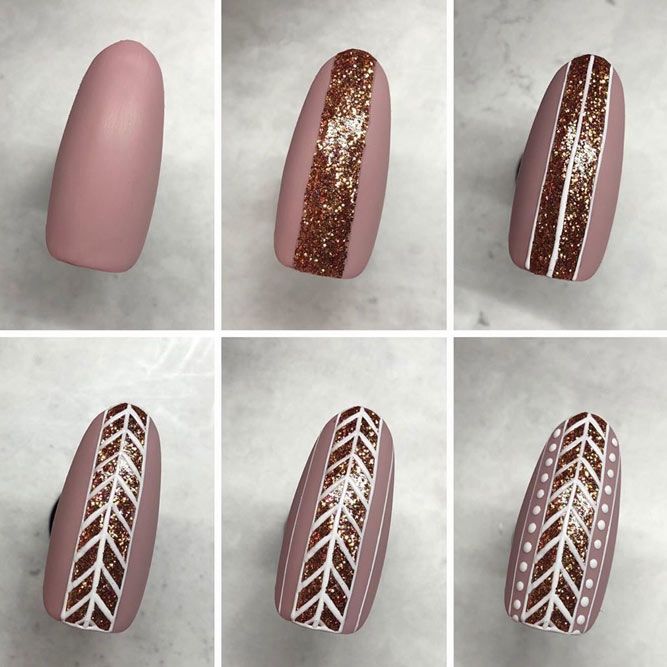
Striped Nails Art Tutorial
Credit photo: instagram.com/fiepedersendkThis design looks over the edge complex if you look at the final photo. However, the process is a lot simpler than you think!
1. To begin with, you need a subtle base coat topped with matter top. When you are done with that step, you need to add a sparkly vertical line to the middle of your finger.
2. Now, using the detailer brush and white nail polish, you need to outline the sparkly stipe and add a think white line to the middle of it. Finish this step by creating a fishtail pattern over the stripe.
3. You are one step away from completing the design. Add some thin white lines and fill them in with cute white dots. That is it!
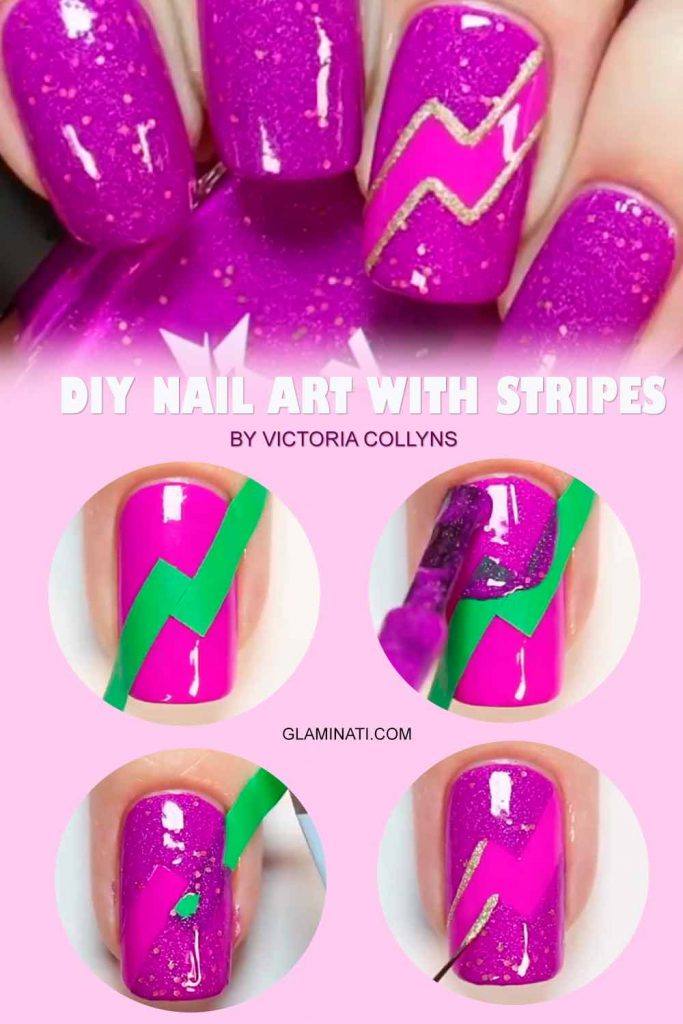
DIY Nail Art With Stripes
Credit photo: instagram.com/vics_nailsPink hues are trendy that if why same-shaded mani is more than relevant at the moment, don’t you think?
1. Coat your nails fuchsia pink and add two stripes to form the flash sign. Add a coat of sparkly pink over the base.
2. Remove the stripes.
3. Outline the flash sign with gold glittery nail polish. As simple as that!
Simple French Nail Designs
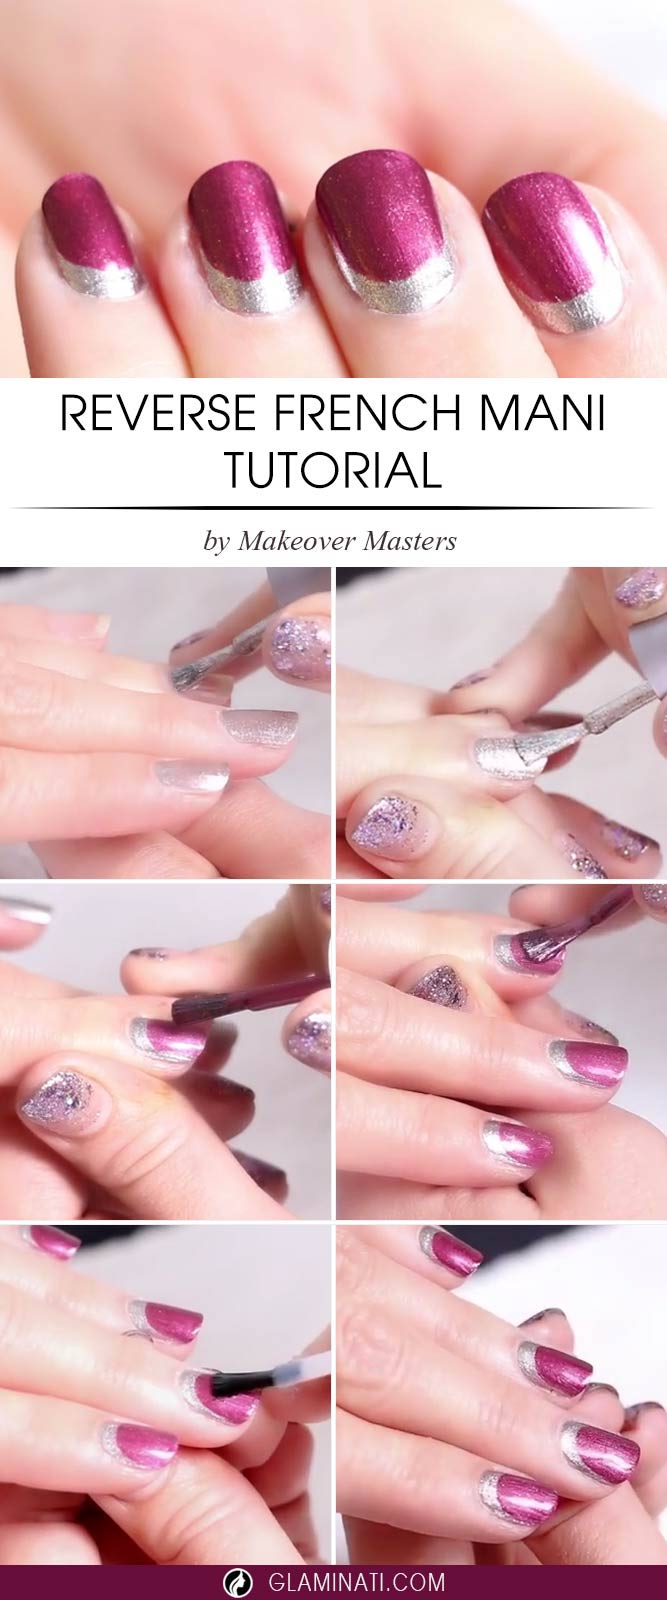
Elegant Reverse French Mani
Credit photo: Makeover Masters via YouTubeThis reverse French manicure is quite elegant and so easy to achieve at home!
1. Apply 2 coats of a shiny metallic shade to all nails and allow to dry completely.
2. Paint a dark shade following the curve of your nail about ¼ of an inch from the cuticle.
3. Add a little swirl of that same color on the metallic shade.
Easy Nail Designs With Simple Hand Painted Art
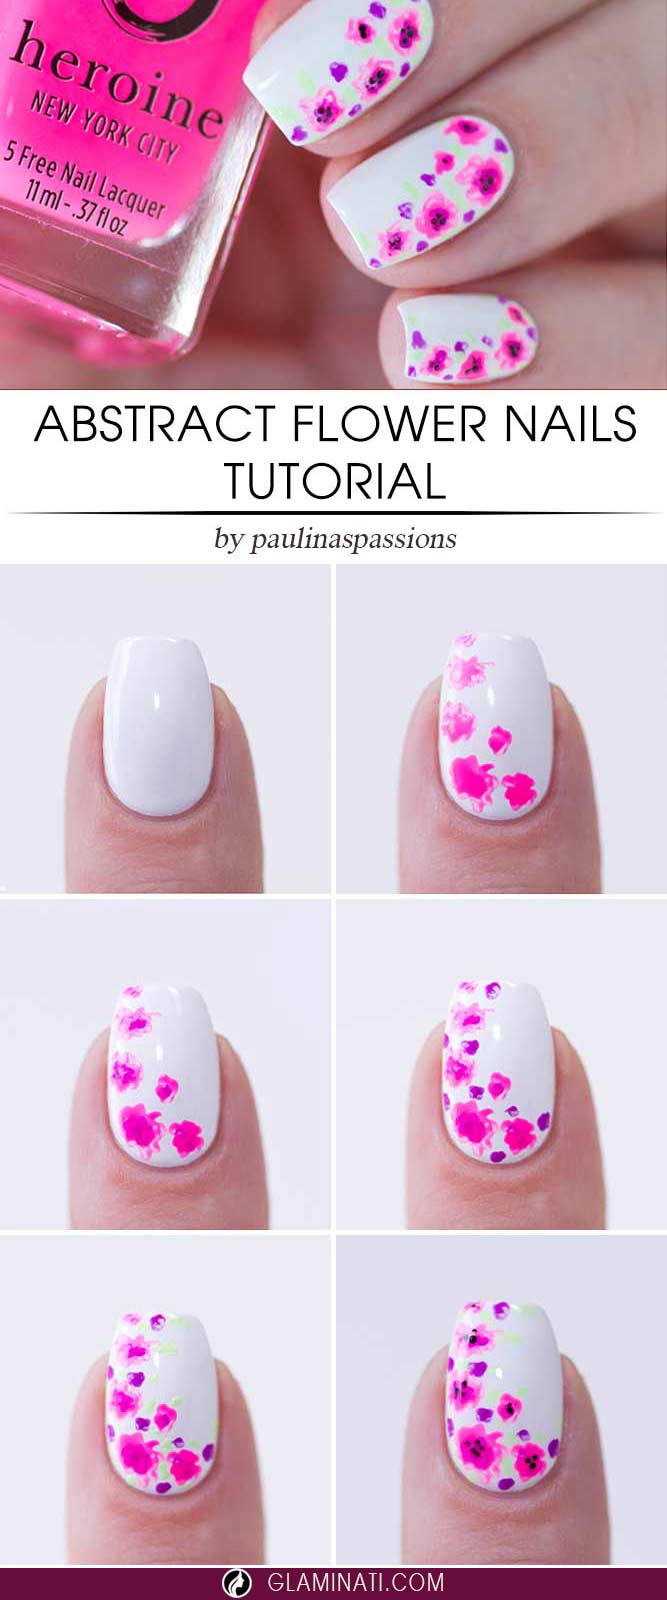
Abstract Flower Nails
Credit photo: instagram.com/paulinaspassionsThis manicure in white is adorned with cute little flowers, which makes this design perfect for a girly-girl image.
1. Apply a base, let it dry and cover it with 2 coats of opaque white nail lacquer.
2. Next, take a small brush for nail art and paint flower petals here and there, using pink nail lacquer. Let the flowers be abstract rather than perfect.
3. Now complete these flowery meadows with tiny flowers in purple, leaves in vivid green, and tiny dots in black to make for buds. Finish with top coat.
There you have it: 6 DIY easy nail designs you can do at home. Experiment with various shades and don’t forget to add a top coat to protect your pretty nail art!
Floral Nail Art
Credit photo: instagram.com/ildikonailartThese delicate flowers are super girly and quite easy to duplicate.
1. Paint your nails the base color of your choice. Allow it to dry completely.
2. Make flowers by dotting a bobby pin. For example, make a three-point shape with 3 dots of polish per nail. You can make one to two flowers per nail.
3. When the flowers have dried, use a third bold color to make a small dot using a toothpick in the center of the flowers.
Watermelon Nails Art Tutorial
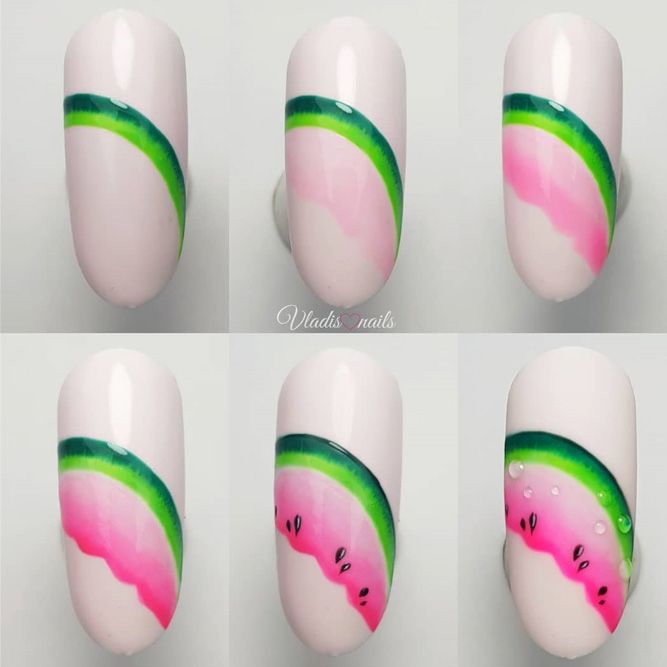
Credit photo: instagram.com/vladislovenailsCreating tasty summer-fresh nail art is easier than easy!
1. Use a white base to make this watermelon design stand out most. Use two tints of green to create the juicy peel. Then, use watery pink for the pulp.
2. It is time to add some definition to your watermelon piece. Use black nail polish to create tiny seeds all over the fruit.
3. Apply a top coat. You can use your top coat to create the magnificent dew drops on the design as well, depending upon your preferences.
Black Heart Nails Art Tutorial
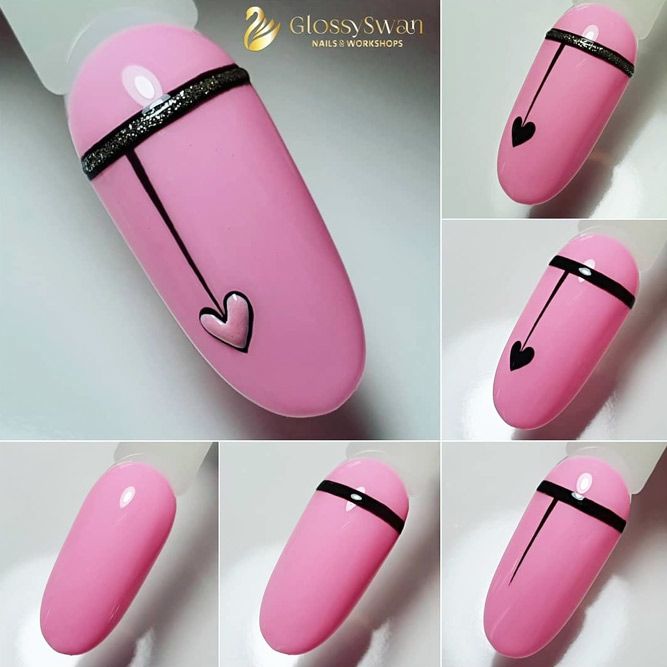
Credit photo: instagram.com/glossyswanCombining sweet manicure with an edgy vibe to it is easier than easy!
1. Choose your favorite pink nail polish. In a few simple gestures, add a black horizontal line and complete it with a vertical one. Draw a little black heart at the end of your vertical line.
2. Adorn the design with some sparkles if you want and fill in the heart with pink nail polish.
3. Apply a top coat. Ready!
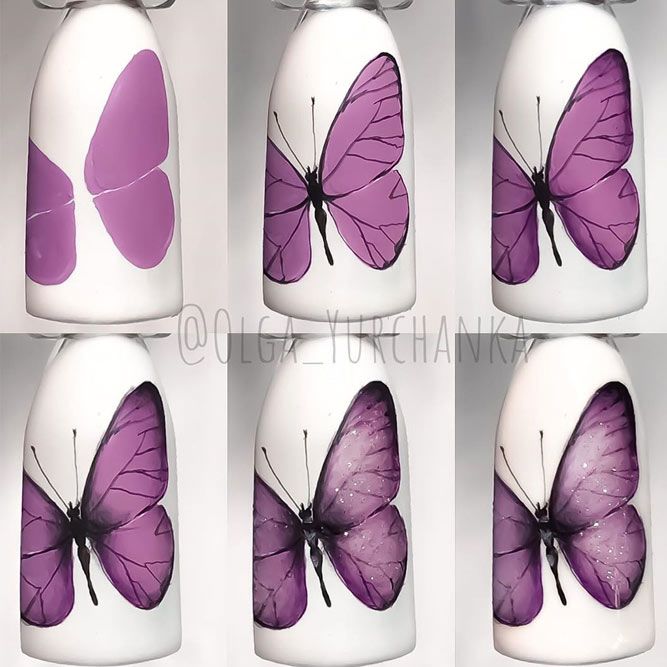
Butterfly Nails Art Tutorial
If you think that butterfly nail art is too complex for you-you haven’t seen this simple tutorial!
1. Use a white base so that the design stands out. Using purple nail polish create butterfly wings sketch. Outline the wings with black nail polish and add some defining black lines to the wings.
2. Add butterfly figure to the center of the design. Use some light purple nail polish to add dimension to the wings.
3. Add some sparkles and apply the top coat to finish the design. As simple as that!
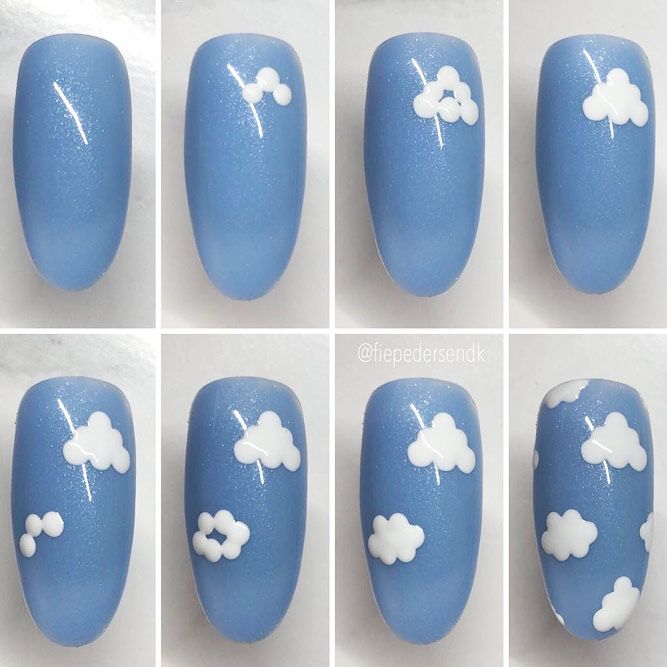
Clouds Nails Art Tutorial
Credit photo: instagram.com/fiepedersendkWhat can be cuter than fluffy cloud mani? A fluffy cloud mani over a sky blue base!
1. Use shimmery blue nail polish as your base color to resemble the sky. Then, with the help of a dotting tool, add white dots to the design so that they form a cloudy pattern.
2. The more clouds – the better. You can use various-sized dotting tools to create more versatile patterns.
3. Apply a top coat. Done!
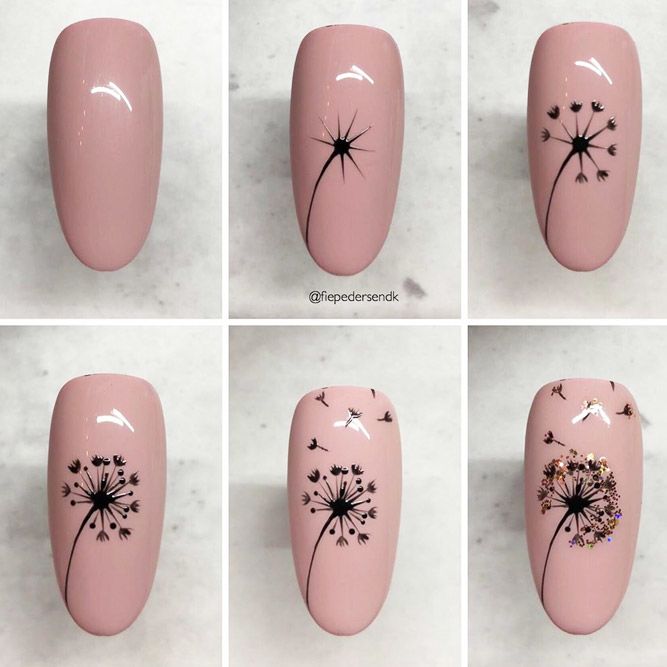
Blow Ball Nails Art
Credit photo: instagram.com/fiepedersendkBlow balls are super cute and are worthy of being depicted on your nail if you are not sure how to succeed with such a mani – follow our lead.
1. Choose a subtle pink or any other quite neutral base. Begin the design with the stem and with the head. Slowly, add more details to the design.
2. Add some fly-away elements to the design. Do not forget to spice things up with some sparkle!
3. Apply a top coat. There you go!
Easy Nail Designs With Vinyl Stickers
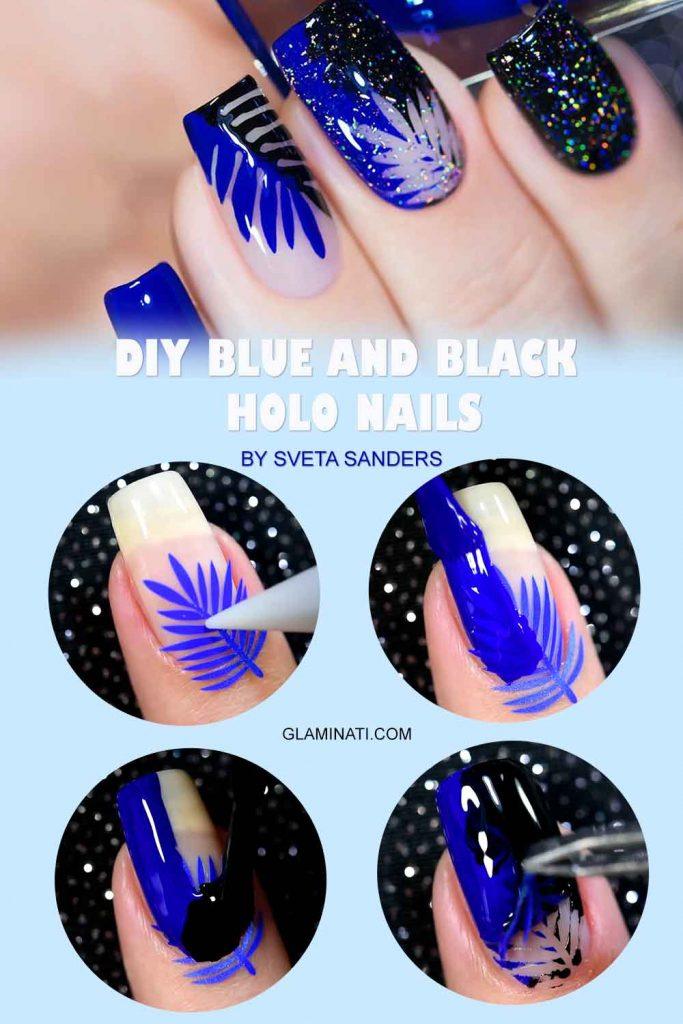
Blue And Black Holo Nails
Credit photo: instagram.com/sveta_sandersSometimes when you look at the design that you find gorgeous, you hesitate to replicate it since you think it is too complex for you. We are going to prove you wrong with this fabulous nail art!
1. First of all, you are going to need to apply a leafy stencil over your nail and cover it with blue and black. It is advised to mix the colors while the nail polish is still wet.
2. Remove the stencil.
3. Coat your nails with holo nail polish. Done!
FAQ: Easy Nail Designs
How do you do cow print nails without tools?
You can do this pattern on all of the nails or choose separate nails for this design.
- Apply base coat.
- Cover your nails in white. You might need a second coat.
- Take black nail polish and using the brush that comes with the nail polish bottle, place irregular dots.
- Apply a top coat.
How do you a simple French tips without tools?
- Apply base coat.
- Use different colors for your tips, clear nails with colorful tips are the latest trend.
- Grab your nail polish and go along the tips of your natural nails, you just have to have a steady hand. You can also dip any clean brush into acetone and clean up the edges. Another way is to tape the and use that as an outline.
- Apply a top coat.
- Perfectly painted nails can express your mood, match your outfit, and reflect your personality, especially now that there are so many amazing colors to choose from. Source
- Nail art is a creative way to paint, decorate, enhance, and embellish the nails. Source
Was this article helpful?


